Tuesday, December 8, 2009

Another Cool Contest...At TodaysMama.com


Straight from their Blog:

Mama’s Holiday Wish List MemeTodaysMama and Provo Craft are giving away a sleighful of gifts this holiday season and to enter I’m sharing this meme with you.

1. What 5 items are on your holiday wish list this year?
1. The Cricut Cartridges that I don't yet have.
2. The Yudu Machine
3. A red or green Cricut Expression
4. A new wardrobe
5. Some new furniture


2. What is your favorite handmade gift you have received?
A large glass jar filled with beautiful Christmas ornaments that a friend gave me.

3. What handmade gift have you always wanted to tackle?
I would love to be able to sew any kind of craft item, but I stink at it.

4. What was the best Christmas gift you received as a child?
It is hard to say. My parents always put so much time and thought into our gifts. Two gifts stand out the most. I got one as an adult right before I got married. I was 20 and I loved Beauty and the Beast (from Disney) so my patents bought me a bed set (comforter, sheets, pilow cases, etc.) of that theme. I just loved it. When I got married and moved out a little over a year later my mom held onto it and still has it. The other thing that sticks out in my mind is a 3/4 trench coat that my parents gave me as a teenager. I remember seeing the love and pride in my dad's eyes when I opened it.


5. What items are on your kid’s wish list this year?
I have 3 great sons! One wants a basketball net. He is a basketball freak and his broke last year. My middle son wants a Zero Gravity Nano car and a Video Game called Scribble Nauts and my Youngest baby wants every new thing he sees pop up on the tv screen...lol!


6. What is your favorite holiday food? It is a toss up between the amazing turkey my husband makes and the delightful homemade pumpkin pie my mom has made for years.


7. What will you be hand-crafting for the holidays? So far I have made 26 glass glitter bulbs that I will give out as gifts. I am going to add each families last name with vinyl.


8. What is your favorite holiday movie? A Nutcracker Scooby Doo.


9. Favorite holiday song? The little Drummer Boy. To me it talks about the real meaning of Christmas.


10. Favorite holiday pastime? Waking up in the morning with my family, opening presents and enjoying each other.

Send us a link to your post to mailto:info@todaysmama.com with “Wish List Meme” in the subject line. You can even tag a few friends to participate in the meme. (Spread that holiday cheer!) Thanks to all of our generous sponsors that helped make Mama’s Holiday Wishlist possible!


Hope some of you who read this join in and try and win too!

Friday, November 20, 2009

Head on Over to the Gypsy Spot

Hey Everyone,
They Gypsy Spot (companion blog to the Cuttleblog Spot) is hosting an AMAZING giveaway!

Here are the rules (directly copied from their blog):

The rules :
1) Become a follower of The Gypsy Spot. (If you are already a follower you met the first step).
2) Post a link about this contest on your blog. If you don't have a blog you can start one at blogspot.com. Its very easy and a great way to share your projects with family and friends.
3) Use Mr. Linky box to give us the link to your blog post. (this becomes our entry list and the winner is chosen from here ) .


AND THE POSSIBLE PRIZE (for one winner) FOR COMPLETING THESE SIMPLE STEPS......A GYPSY.....DONATED BY CUSTOM CROPS!!!! So head on over to
http://the-gypsyspot.blogspot.com/ before December 1st and sign up to be entered into a random drawing!

Saturday, November 7, 2009

Pooh Christmas Gift


Another A2 card. The card base is Bazzill. I love this cardstock because it is so sturdy. It is great for a card base. I like it overall, but it is more difficult to cut detailed designs on the Cricut. Pooh is from the Pooh and Friends cart and is cut at 3". His hat is from the same cart, but I used my Gypsy to make it fit his head just right. The Christmas gift is also cut at 3" and is from the Hello Kitty Greetings cart. I added a large gem in the middle of the bow for some bling. The holly leaf corners are from Winter Woodland and are 1". I added a little bling for the berries. The tag behind everything is from Gypsy Wanderings (one of the best carts ever created). I tied some green ribbon at the side. All the patterned paper is from the DCWV Holiday Collection Christmas Stack for this year. I used my glitter pen around the holly leaves for dimension. I also used yellow pearlescent chalk to make him glow (it is hard to see in the photos) and pink on his cheeks. TFL!

Tweeting You A Happy Birthday


Happy Saturday Everyone! This card is a Happy Birthday card for my "stash". I love the Gypsy. It allows me to use so many carts at once. And I am using more carts than ever! This is an A2 card. The cardstock base is Bazzill. All the patterned paper is from the DCWV stack called MiCasa. That stack has so many beautiful papers. The bird on the front is from Stamping Solutions (cut at 3"). The shape it is placed on top of is from Gypsy Wanderings (cut at 4" (I think)). Then I layered that shape on top of some of the glittered paper I used for the bird. The "tweeting you" is from Lyrical Letters and is welded together and sized to fit the card. I also used some ribbon and some bling for the eye to add some detail.
On the inside the "happy" is the Hello Kitty font. The "birthday" is from Simply Sweet. The "a" is handwritten. It is easy to make and I like the outcome. TFL.

Monday, November 2, 2009

Warm Winter Wishes


This is an A2 card created with my Gypsy, Winter Woodland, Christmas Cheer and Gypsy Wanderings. The snowflakes are from Christmas Cheer. The snowman and all his cute little accessories and the inside phrase are from Winter Woodland. The shape the phrase is on in the inside of the card is from Gypsy Wanderings. I added a cute little "blingy" snowman next to the big one and some other bling around the card. I also used Azure blue Cat's Eye Chalk all around. The paper is from the newest DCWV Christmas Stacks. Not sure where the ribbon is from. :)


Monday, September 14, 2009

Super Grover!!!


UP, UP AND AWAY! Here comes Super Grover....I made this card for a little friend of mine. He was turning 3. He loves super heroes and the Sesame Street cartridge was the first thing that came to my mind. Now, he probably would have liked Batman or Superman more, but since those carts aren't out yet, I thought Super Grover was way cute!
The patterned paper came from a MAMBI all boys pad. Grover is cut at 5". I used glitter pens of different colors all over the place. I also used red stickles on Grover's "G" on his costume.
The city at the bottom is cut from Paper Doll Dress Up and sized in Design Studio.
The word bubble in the corner is also cut from PDDU. TFL!

Super Grover-Inside of Card


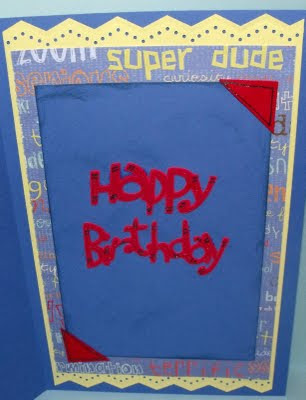
This is the inside of my Super Grover card. It is created with several layers of cardstock and patterned paper. The bottom layer is the card (blue) The next layer is yellow. I punched the top and bottom with a Martha Stewart border punch. The next layer is a patterned paper that matches the outside of the card. The top layer of this part of the card is blue. I inked around the edges of this part of the card and then added red photo corners. I just cut a 1 inch square in half to make these.
The title is cut at 1 1/2 inches from Zooballoo. I also shadowed it with a similar color (just enought to give it a tiny bit of pop). I went over the top of the Happy Birthday with a clear glitter pen and then parts of it with a navy blue glitter pen.

Friday, September 11, 2009

Trick or Treat Wall Decor - Part 2

This is my favorite photo of the whole front. You can see all the elements. I described the elements of the monsters in my last post. In this post I will share the rest of the details. Behind the mosters is a rickety fence. It is from PDDU. First I used the Cricut markers on it and then I cut it.
The paper I used for the background is from a stack I got a Michael's. It has some vinyl on it. I backed it with orange and then black again. I used the newest Martha Stewart spiderweb punches to make a border all the way around the page. I love the effect this has.
There is also a cute little spider and web on the right hand side of the page. It is from the Slice also. I inked the web just a bit so it wasn't super bright. There are some ghosts on the other side of the page and I inked those the same way. I also used a silver glitter pen on those so all their features could be seen.
This wonderful file was created by Tina Mansfield of Cardiology Creations. The bat is not a part of the file. The file comes in a few different parts. It cuts very easily. I cut the candy corn bases, parts of the candy and the "TRICK OR TREAT" out of DCWV glitter cardstock. The yellow is just a regular cardstock. I tied bows around the candy. I also inked the edges around the candy corn with a Cats Eye ink pad in orange. The bat hanging from the title is from the Slice card Spellbound. I embellished him with a both the clear and orange glitter pens.

The circle moon is from the Slice card Basics 1. I added a slivered moon on top of it cut from DCWV glitter paper. It is from the PDDU cart. I embellished with an orange glitter pen. The bats are also from the Slice. The design card is Spellbound. I love that the Slice has 2 great design cards with alphabets on them! These bats have been embellished with the clear glitter pen.
I think that's it! TFL! Comments are greatly appreciated!

Trick or Trick Wall Decor

This is a project I made for Halloween to hang on my wall. I think I will probably put it in a frame before I hang it. This is post 1 of 2.

This is the whole project. There will be another photo in the next post. I used my Cricut, SCAL program, and Making Memories Slice. The Trick or Treat at the top is a file from the talented designer Tina Mansfield of Cardiology Creations. This is a close up of all 5 "monsters". There is an alien (at least that's what I think that's what that fluffy purple thing is lol!), Frankiestein, Witchypoo....with her scaredy cat, and a Mummy. I used the Cricut Paper Dolls Dress Up Cartridge to make all the monsters. The alien is cut at 3". I used a blue Sakura Gelly pen to go around the edge of the alien. It looks way coool in person. Frankiestein is cut at 3 1/2". His face is stamped on with a Peachy Keen stamp. I embellished his clothes with the same type of pen, only it was clear with just glitter.


Ms. Witchypoo is cut at 3". I gave her a broom and a cute little scaredy cat. The cat's eyes are a little hard to see, but they are made with a green glitter pen. The broom handle is hand colored with a brown marker and so are all the cuts on the broom bristles. I embellished the witches clothes with the clear glitter marker.
The Skeleton and Mummy are both cut at 3". For the skeleton I had to use a white pen to highlight all the bones. It took forever! But I am happy with how it came out. I also used googley eyes. For the Mummy I used a brush tip marker to highlight all the cuts and then used a glitter pen on top of the brush strokes. After that I used a Colorbox Cats eye ink pad on top of and around the edges of the mummy.

Friday, August 28, 2009

Hello Ladybug-SCAL and Stamping Solutions


Hello Everyone! Many parts of this are a wonderful design file from Card-I-ology Creations by Tina Mansfield. There are so many great layers to this file. The parts that I have included in this card are: the ladybug, her wings, the leaves and the card base. There are also more layers included with the file. I just decided to make my ladybug extra large, so I used a few less pieces.
The card base is made from a K & Co. paper pad called Wild Saffron. It is a double sided paper and it has a good, thick quality to it. I cut the lady bug in three layers. The base is a light brown cardstock. The first set of wings is one side of the patterned paper. The top layer of wings is cut from Bazzill Swiss Dots cardstock. I pulled it all together with a brown polka dot brad. I added some googley eyes for fun. I went aroun the edges of the outer wings with a brown pen so they wouldn't get "lost" on the card. I also added glitter pen around all the bug edges and white dots here and there. I thought she still needed some bling so I put some yellow gems in her wing holes. The ribbon is a sheer lime green polka dot. I put a Making Memories staight pin through the middle of the bow. The leaves are cut from Canson Effects Iridescent paper.
On the inside I added a lining that was slightly smaller than the card. I used the Slice (Noteworthy Design Card) to cut photo corners from leftovers of the patterned paper (this time from the front side of the paper). The cute lemon looking shape and the word Hello are from the Cricut cart Stamping Solutions. I added some white dots here and there and some gems for some bling. TFL!

Saturday, August 22, 2009

Boil, Boil, Toil N Trouble Wood Gift Bag


This is my first creation as a member of Card-I-ology. I am really happy and excityed to be a member of this Creative Team! You can find this file here: http://www.visualdesignsbychris.com/store/product.php?productid=16599&cat=0&page=1
It comes in AI,GSD,KNK,SCUT,SVG,WPC formats.
So, now for what I did. The bag is a cute little wooden bag that I found at Michael's. It was $1. I thought it would make an adorable size to give as a teacher gift full of candy at Halloween. The bag comes unfinished so I gave it 2 coats of black paint. While that was drying I cut and put my file together. It is cut with the Cricut machine and SCAL program. The shadow layer of the file is is cut with American Craft AC Specialty Paper-Foil. The top layer is cut with K & Co. Halloween Specialty Paper pack by Tim Coffey. The witch's cauldron and stirrer for the cauldron are glitter paper from last year's DCWV Fall Glitter mat stack. The green "brew" and bubbles from it are just a carstock I had in my scraps stash. I used glue dots to put it all together. They stick really well to wood. I added ribbon to the bottom and one of the handles for some flair. TFL!

I am SOOO EXCITED!

I am so excited to announce that I have become a Creative Team member of Card-I-ology Creations by: Tina Mansfield. She has created some wonderful files that are available over at http://www.visualdesignsbychris.com/store/manufacturers.php?manufacturerid=6&sort=&sort_direction=&page=2. Stay tuned for my first creation with one her great designs!

Thursday, August 20, 2009

Contest At JuJu Bees Scrapbook Corner


There is a great contest going on over at Juju Bees Scrapbook Corner and it is ending tomorrow and I just found out about it! Here is the link:


You have a chance to win the new Everyday Paperdolls cartridge for the Cricut. This one is definately on my wish list!

Tuesday, August 18, 2009

Going Batty Cut File


This is what the "bats" look like when I put them together. They are make exclusively with the Jubilee cartridge and the Design Studio Software. They are made simply with the holly leaf cut and the blackout shadow of the "o" welded together.
I also made a second layer with a shadow for each size and a layer with a head/face that was slightly smaller that can be placed on top of the bat.

This is what the preview page looks like. On the smallest size bat (1") there are small cuts in the middle. I could not zoom in enough in the middle to hide those contours. That is part of the reason I made the extra faces to put on top. After I put the bats together I really liked how the extra layer looked on the bats.

If you have any questions about Design Studio or would like my "Batty" file, please feel free to email me at scrapbooknut2002@yahoo.com. Thanks for looking. I would love your feedback!

Going Batty Scalloped Gatefold Card


It is no secret that I am a HUGE fan of Halloween. There are not alot of cuts on the Cricut for Halloween, so I decided to see what I could "make" on my own with Design Studio. And the bats are what I came up with. They are super simple. I made them with the Jubilee cartridge. I will show what I did in my next post.
The card itself was cut with the Cricut and SCAL. It is a scalloped gatefold card. It from a svg file I got at SVGcuts.com. I layered each side of the card with K & Co. patterned paper that was framed with some green cardstock. The middle die cuts are 2 scalloped ovals. They are Spellbinders nestabilities. This is my first set of these and I totally love them!
The bats are created in 2 sizes and shadowed. I also created and extra head/face to give them depth. They faces are on pop dots, as are most of the bats. I also added a batty charm around the scalloped oval with some sewing floss. Around the border of the bottom I added some K & Co. pumpkin paper ribbon.
On the inside I added patterned paper to the sides. It is the flip side of the front paper. It is from a K & Co. paper pad. They have some really great Halloween goodies!
All of the words are from the Slice Design Card Spook Alley. It Rocks! It has a couple of flaws in the shadowing that I have contacted the company about. But, I am sure they with fix them right away. They are a really great company to deal with.
And so my Halloween creating continues..............I can't wait to make more!

Friday, August 7, 2009

Halloween Skull Card


The Spongebob Cricut cart has some great gems on it! One of them that I found was this skull. It is a great cut for Halloween. I have also found that I really like Core'dinations paper line.
For this card I used a K & Co. Halloween paper pad for the patterned paper. I backed that with a purple-ish frame. I cut a few sizes of circles (sorry, I cant' remember what sizes ): ). The skull is from the Spongebob Squarepants cart. It is one of the feature keys and doesn't have a shadow feature, so I used Design Studio and made my own shadow. It is not a perfect shadow, but it worked for what I needed. I used Core'dinations Black Magic paper behind the skull and embossed it with the Cuttlebug Distressed Stripes embossing folder and then sanded it so the purple under the black could be seen.
The smaller circle is cut on the Cricut and then embossed with Cuttlebug from the set called "Stitched Circles" and sanded. The "Happy Halloween" is cut with SCAL.
The crows on both the front and back are from the MM Slice card Spellbound. On the front I cut the crow 3 times and layered one on top of the other to make it look thicker. The ribbon is from Target.
On the inside I just used a matching purple cardstock and used the Martha Stewart Spiderweb corner punch to give it a little pizazz.
On the back I used the Martha Stewart Drippy Goo punch and then layered with a matching piece of patterned paper. I added a matching circle and crow to finish it off. TFL!

Thursday, July 30, 2009

Oh My Crafts Contest

So Ohmycrafts.blogspot.com is having a great contest to win an Itop brad making tool! I really love their online store at www.ohmycrafts.com. I got my Making Memories Slice machine there in May and have used it bunches. It is a great machine and I got a great deal on it! I have made many projects with it. I am currently working on some cards for Halloween. I am using my Slice with the Spellbound design card. I just saw all the new released at CHA and can't wait to pick some of them up.

Thursday, July 23, 2009

Alien Scape Happy Birthday


This is a boys Happy Birthday card with cuts made from a file set that I bought from http://www.svgcuts.com/. They have great files for sale at reasonable prices (and no, I don't work for them or get a commission, lol!). They just have great stuff. All of the cuts from the front (except for the font is from that file collection). And the "out of this world" and the UFO on the inside are from that collection. The oval is a basic shape that comes with the SCAL 2.0 program. And the "sunshine-y" shape behind the oval is one that I got from Susan Bluerobot's blog. You should check it out, she is soooo talented!
For the front of the card I used a thin black cardstock and I splattered it with white paint to make the background. The aliens, the sun, Mars, and Saturn are all just different colors of cardstock cut and layered. "Happy Birthday" is the font CK Bowlorama. I used googly eyes on the aliens to make it a little more fun.
On the inside I used sticker letters for the "you are". I also lined the inside of the card with a thick purple cardstock to make it sturdy. The size of the card is 8 1/2"x5 1/2".