Showing posts with label Gypsy. Show all posts

Saturday, April 9, 2011

Friend-Imagine More Cards


Well, I got my Imagine replaced in record time! Thank you Provo Craft! And I got to work making this friend card. The Imagine More Cards cartridge has easily become my favorite Imagine cartridge. The base of this card is made with Elegant Edges. I used my Gypsy to weld 2 of the book covers together. I just placed 2 of the same shape on the mat, flipped one, overlapped them just a bit, grouped and then welded. And viola, a card base with a beautiful edge. I am really liking Elegant Edges too! This is a long awaited cartridge by many Cricut lovers.

The front of the card is all done with Imagine More Cards, cut at 4 inches. I cut pink cardstock just slightly bigger to go behind the image and for the inside of the card. I inked all the edges with a matching color to add depth and texture. I also used my Marvy glitter pen for some glitz. I sprayed the base of the card with Hot Chocolate Chalkboard Glimmer Mist. It is hard to see in the photo, but it adds some goodness in person. The word "Friend" is on pop dots.


I used pom pom trim and rolled it up in a circle to make an embellie and put a cute little button on top of that. I also added a bit of ribbon. The finished size is 5"x5" (the butterfly sticks out past this). Thanks for stopping by to take a peek!

Monday, January 3, 2011

You are fabulous Card - Cricut Paisley and Street Sign


Hi all! Here is "for the fun of it" card I made today. The base of the card is a standard 5.5" x 4.25" card. I just cut it so it would open to the side instead of to the top. The "You are" is cut at 1" using Street Signs. The "fabulous" is cut using "Paisley" at 1" The mushroom is cut at 3.50" also using Paisley. This cut has a few layers, but comes out darling. The patterned paper is from a DCWV Spring stack that is a few years old. The cardstock is Core'dinations. I added a bit of bling. I just love how the colors came out on this one! TFL!

Wednesday, December 29, 2010

Simple Peony Card-Picturesque and Smiley Face


This is a way simple and easy card to make. I created it with my Gypsy, Cricut Picturesque cart, George and Basic Shapes cart and digital Smiley Face cart. The card is cut at 4.75 inches. It is from the Smiley Face cart. I cut the card from a beautiful pearlescent paper from a K & Co. stack. It is double sided. I thought it may be hard to write a message on, so I cut the card a second time on a less "slick" paper. I cut it on my Gypsy and when I did this time I used the "hide contour feature" to hide the circle. Then I used the George cart to cut a bigger circle. The reason for this is so that this paper can't be seen from the front. I only used the bottom half of the card inside because I really liked the double sided paper that was already there for the top.
The peony is from Picturesque and is cut using the framework feature. This is one of the very reasons I wanted this cart. It is amazing! The truth is, I always thought this cut was a rose, until I read the booklet, then I found out it is truly a peony...lol. Anywho, it is cut at 2.75 inches. Then I used the basic cut for the background and glued the framework and basic cut together. I put it on pop dots and put it in the center of the card. I added some ribbon around the bottom and viola...it is done! TFL!


Monday, November 29, 2010

Over The Hill-Wrap It Up


Hi Everyone! I hope you all had a great Thanksgiving! I did. It was just my little family, my mom and my little bro. My husband cooked a delicious turkey and all the fixins'. And one of the best parts about having a teenage son is that he got to do the dishes!!! Yeah for me!

Anywho, here is the next set of cuts in the Wrap It Up cartridge handbook. It is on page 22. This cartridge is so versatile. This set of cuts is titled "Over the Hill". The first cut is the basic cut. It is cut at 5 inches, as are all its layers. I added some gems in the leaves.
The second thing pictured is the "Over the Hill" phrase cut. It is also cut at 5 inches. I cut the base in red and then the shift key in blue. Then I actually cut the tree top from the basic cut (in purple) to add to the top of this tree. It is not one of the layers for the phrase, but it fit pretty good. It is slightly big, but not noticeable from the front. Gems again here on the tree.
Third is the tag. It is cut at 4 inches. I cut the tag in blue. Then I cut the blackout for the tag in purple. I wanted a shadow for this tag, so I made my own. I used my Gypsy. First I "hid" all the holes on the tags so they wouldn't show when they were cut. Then I copied the blackout cut of the tag. Then I increased the size of the copied shape. I assembled the tag and then I used my Crop-A-Dile to punch a hole through the middle of all 3 tags. I think the shadow looks like it belongs. I added some ink to the blue layer. I also added a red and a green gem to the leaf.
The next cut is the box. The max size for this on your Gypsy is 11.5 inches. I cut this in red. I assembled it and then stapled the sides of the boxes before I glued the tree sides up. I also added a purple square panel to the 2 sides that have trees. Those squares are not a part of the box cut. Again there are some gems on the leaves.
And last, but not least, the card. It is a card that is folded at the top. It is cut at 5 inches. It is not the most perfect card I have ever made, but I still like it. The scallop is from Mini Monograms. The tree/hill are relative to the size of the card. I covered the tree with Martha Stewart fine glitter. The red gems went on the side of the card this time. The tree is on pop dots.
I used the Marvy Uchida Glitter pen and American Crafts White pen for dots and glitz everywhere. TFL!
I used

Saturday, September 18, 2010

Count Your Blessings Birdies


I made this card for a friend who just had a baby. On the inside it says. "Count Your Blessings". The birds are cut from Wall Decor and More at 4". The photo corner is from Picturesque and is cut at 1.5". The ovals are custom sized on my Gypsy to fit the birdies. I used George and Basic Shapes for those.
The paper is from the DCWV Latte stack. It has such rich and beautiful colors! The purple in the stack just sang to me. I added some ribbon and a brad and some glitter pen here and there. I don't think I know how to make a project without my glitter pen! TFL!

Tuesday, September 14, 2010

Halloween Mini Book

This is a Halloween mini book I made. I made it for a family member that doesn't get to see my boys very often. This is most of the book. Then after Halloween I will put pics of my boys in the book and mail it off. TFL!

The book is overall 6"x6" chipboard. All the cuts I made were from Happy Hauntings. Mini Montsters, October 31st, Lyrical Letters or George and Basic Shapes. I am so glad that Provo Craft finally came out with some Halloween carts this year. Of course I used my Gypsy to size and add dimension to everything. For the cover I used paper from the new DCWV Halloween Stack. The haunted house is from October 31st. The ghosts are from Happy Hauntings. It is really hard to see in the photos, but I used gray and green chalk in on the ghosts to make them look like they glow in the dark. It looks cool in person.

The paper on these 2 pages also comes from the newest DCWV Halloween stack. The spider web is from October 31st. The spider is from Lyrical Letters.


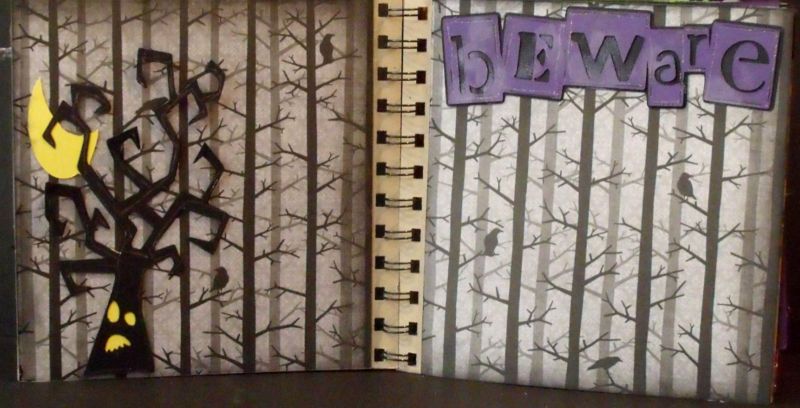
This is the same paper as from the front and back of the book. The tree is from Happy Hauntings and the "beware" is from Happy Hauntings.


The paper on this is from a Cloud 9 seasonal stack. The "drippiness" at the top is from the Martha Stewart Drippy Goo punch. The "Caution" sign is from Happy Hauntings.


The paper on this is also from Cloud 9. The shape punched "into" the corners and edges is also Martha Stewart punch. It is a new one this year. I think it is called Crackle. I think it looks like brains.....muahhhhhhaaaahahha.


The paper on these 2 pages is from a way old DCWV Fall stack. It pays to be a hoarder...I mean...collector sometimes....lol. I really love how these 2 pages came out. The eyes are from October 31st. The letters are stickers from Joanns. The brads are Making Memories.


The paper on this layout is last year's DCWV specialty Fall stack. The ribbon is K & Co. The 3D dancing skeltons are foam.


This little layout is super simple, but fun. The vines are cut from October 31st. The pumpkins and owl are K & Co. stickers. And then I added a few seqiuns 'cause I always gotta' have some bling.


The paper on this spread is from a stack from K & Co. from last year. It is a 2 sided paper, so each side is the reverse of the other. The title is from Mini Monsters. It says "A Little Batty". I love how this cart layers together. It is super easy to use. I also used a Making Memories Brad and some fibers.


The paper on this is from K & Co. also. It is a 2 sided paper. I created the candy corn on my Gypsy from the George and Basic Shapes cart. I also created its shadow. I started with a rounded edge triangle and adjusted the width. It was easy peasy from there. I inked all the layers with orange chalk ink for some depth. The ribbon is K & Co.


This is the candy corn page opened up.

This is the back. I might add some ribbon or fiber once I add all the photos into the book. I learned waaaaay to much about Blogger today!!!! But, at least I can post a bunch of photos at once! Thanks so much for looking.

Tuesday, August 17, 2010

I had an Orange Dream....and this is what I came up with....-MM, SFTN


This is a card I made today. I call it orange dream because of the colors. My dh days it makes him think of an orange creamsicle. The colors are much more vivid in person.
The card base is made from 2 sets of 2 scallop squares from Mini Monograms welded together on my Gypsy and then welded to each other. Once I cut them out on my Cricut, I just folded the piece in half and viola, you have a card! The cardstock is from Core'Dinations. It is new at my Joann's. It is a solid core line and I love it! It takes embossing great. I embossed it with the Sizzix flower vines embossing folder.
I added i-Rock gems to parts of the embossed paper. I added 2 layers of Ribbon to the side of the card. I also added Prima flowers to the front. They are sprayed with homemade Glitter Mist and a diamond brad in the middle.
On the bottom corner there is a butterfly from Straight From the Nest. It is in blue because my 13 year son said "Mom, that card needs some blue. It just won't be complete until you add blue to it." He wouldn't let me be until I added blue. So, for him there is blue! TFL!


Saturday, August 7, 2010

Let's Montster Mash


Logan wants to know where the party is and why he wasn't invited....lol!!!

This is for a design team entry for the Pink Cricut Design team. All the details for entering are at http://www.pinkcricut.com/2010/08/rest-exciting-news/. The owner of the blog will be holding a contest on Facebook on starting on August 12th and ending on August 14th. It will be a "like" contest. If you "like" my card, I would appreciate your vote!
The characters were cut with the Cricut and the Happy Hauntings cartridge. The top note style cut was cut with the Gypsy Wanderings cart. The 3 rectangle shapes were left blank as a part of the contest. They would be rubber stamped with " Let's" "Monster" "Mash". It is from the "A Haunting we will go line from Pink Cricut. TFL!

Wednesday, July 28, 2010

Club 33 Thanks, Part 1-Mickey and Friends, Lyrical Letters


I had such an incredibly good time making this card! I think the friendship and kindness of the people who sent us on our trip was so fresh in my mind when I made my "thank you" cards that my creativity was on a a high! I used the Mickey and Friends cart for the Mickey. The "33" is from the Mickey font. The "thanks" was from Lyrical Letters. The "you rock" is from the Solutions Stamping cart. The "Disney" is cut from the Mickey font cart. It is the charm feature. I inked it and then dipped it in UTEE several times and dried it with a heat tool. Before I did all that I outlined the letters with glitter pen. Then I added a Mickey head eyelet and some chain and threaded it through the middle of the card. There was lots ink, glitter and tons of Gypsy welding! I had such a great time on both my trip and making my "thanks" cards! TFL!


Club 33 Thanks, Part 2-Mickey and Friends, Lyrical Letters


This is the second to a two part post of my last thank you card to my amazing friends who sent me and my dh on an great weekend trip! I had so many photos for this card that I had to do it in two posts. This part of the post shows the right part of the card. I created a pocket to insert a note into. I added Mickey to the top and then added my note later. TFL!

Tuesday, June 22, 2010

Orange and Blue Paisley


This is an unusual color combo for me, but I fell in deep like with it (lol). The photos don't do the colors justice. The printed papers are from this year's DCWV Spring Stack. The paisley, paisley mat, and flower layer are from Straight From the Nest. All the rest of the cuts are from Just Because Cards. I used my Gypsy to size everything. It makes it so much easier. Then I can save the format and use the components later for other cards. I added a bit of ribbon to this one and just 3 little blue glass gems on one side. The envie is also from Just Because Cards. That is truly a great cartride for building a card. TFL!


Thanks A Melon - Just Because Cards


Another fun one to make. My mom came in and raided my "Thank You" card stash last week, so I thought I would make a few of these to start rebuilding. It is made entirely from Just Because Cards with the Cricut. I made it all with one page from the book. I added my usual pen embellishing...white marker and glitter pen here and there. I also added a little ribbon and put the watermelon on some pop dots for dimension. The envelope is also from JBC. Forgot which page. I used my Gypsy to size it to fit my card. The paper is from last Summer's DCWV's stack. TFL!