Showing posts with label George. Show all posts

Tuesday, September 14, 2010

Halloween Mini Book

This is a Halloween mini book I made. I made it for a family member that doesn't get to see my boys very often. This is most of the book. Then after Halloween I will put pics of my boys in the book and mail it off. TFL!

The book is overall 6"x6" chipboard. All the cuts I made were from Happy Hauntings. Mini Montsters, October 31st, Lyrical Letters or George and Basic Shapes. I am so glad that Provo Craft finally came out with some Halloween carts this year. Of course I used my Gypsy to size and add dimension to everything. For the cover I used paper from the new DCWV Halloween Stack. The haunted house is from October 31st. The ghosts are from Happy Hauntings. It is really hard to see in the photos, but I used gray and green chalk in on the ghosts to make them look like they glow in the dark. It looks cool in person.

The paper on these 2 pages also comes from the newest DCWV Halloween stack. The spider web is from October 31st. The spider is from Lyrical Letters.
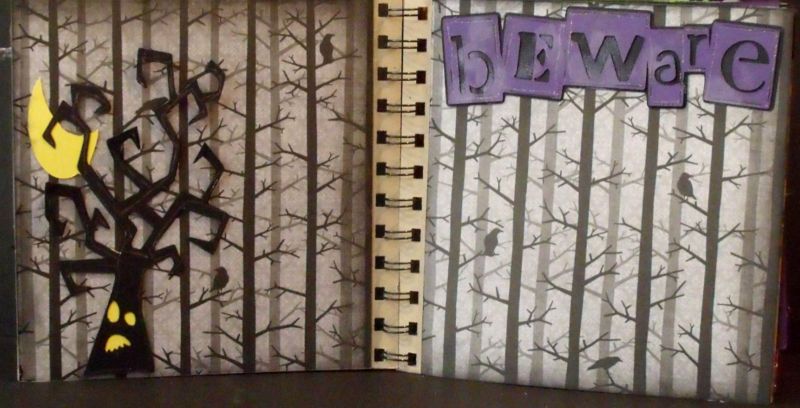

This is the same paper as from the front and back of the book. The tree is from Happy Hauntings and the "beware" is from Happy Hauntings.


The paper on this is from a Cloud 9 seasonal stack. The "drippiness" at the top is from the Martha Stewart Drippy Goo punch. The "Caution" sign is from Happy Hauntings.


The paper on this is also from Cloud 9. The shape punched "into" the corners and edges is also Martha Stewart punch. It is a new one this year. I think it is called Crackle. I think it looks like brains.....muahhhhhhaaaahahha.


The paper on these 2 pages is from a way old DCWV Fall stack. It pays to be a hoarder...I mean...collector sometimes....lol. I really love how these 2 pages came out. The eyes are from October 31st. The letters are stickers from Joanns. The brads are Making Memories.


The paper on this layout is last year's DCWV specialty Fall stack. The ribbon is K & Co. The 3D dancing skeltons are foam.


This little layout is super simple, but fun. The vines are cut from October 31st. The pumpkins and owl are K & Co. stickers. And then I added a few seqiuns 'cause I always gotta' have some bling.


The paper on this spread is from a stack from K & Co. from last year. It is a 2 sided paper, so each side is the reverse of the other. The title is from Mini Monsters. It says "A Little Batty". I love how this cart layers together. It is super easy to use. I also used a Making Memories Brad and some fibers.


The paper on this is from K & Co. also. It is a 2 sided paper. I created the candy corn on my Gypsy from the George and Basic Shapes cart. I also created its shadow. I started with a rounded edge triangle and adjusted the width. It was easy peasy from there. I inked all the layers with orange chalk ink for some depth. The ribbon is K & Co.


This is the candy corn page opened up.

This is the back. I might add some ribbon or fiber once I add all the photos into the book. I learned waaaaay to much about Blogger today!!!! But, at least I can post a bunch of photos at once! Thanks so much for looking.

Thursday, June 3, 2010

Basketball Travel Team - Basketball Solutions


My oldest son 13 and has been playing basketball since he was 8 years old. He has gotten pretty good. But, most of all he really loves the game. Actually that is a HUGE understatement. I think he sleeps with his basketball....lol. He played on his first travel team this Spring and really liked it. But it was hard. It took alot of hard work and committment. It really helped him improve his game. He is also very fortunate to have gotten an outstanding coach that has really taken an interest in him over the years and helped him grow.
So, this is a layout for his travel team season. Most of the cuts are from the Basketball Solutions cartridge. Actually, all but 2 cuts are from Basketball solutions. On the right side of the page the title says "Shooting Guard". It is cut from patterned paper. It has a
K&Co. Grand Adhesions sticker at the bottom. The die cut under the "Shooting Guard" is the Score board cut from that cart. I put brads in all four corners, layered in on grey and black cardstock and put it up on some pop dots.
The words "Travel Team" on both pages are rub on letters from Making Memories. There is a half-court die cut on each page that I sized on my Gypsy and matched up to make it look like a full-court when I put the pages together. There are several places I left open with photo mats for, well, my photos. I will add those soon.
On the left side of the page I added an extra mat and ribbon to one of the photo mats. It is for the teams Championship picture. It was their 1st season together and they one the whole thing! I used another K&Co. sticker for the basketball. I designed the basketball net myself on my Gypsy. The base is cirlcle that I shrunk to a funky oval. The pole part is a rectangle that I elongated. Those 2 cuts are from George. The backboard and net are from The solutions card. I think the square is from George too. I sized and welded everything together and then cut it in black. Then I copied the whole thing onto a second page and seperated the welded image. I cut each piece in the individual colors I wanted and glued them down. Doing it this way gives it a strong base and adds depth. I added black Cat's Eye Ink everywhere. This was very fun to do. TFL!

Monday, May 3, 2010

Teacher Appreication Gift


I feel very blessed this year with the teachers my youngest son has had. His first teacher in Kindergarten stayed through the beginning of April. She is a great woman. My older 2 boys had her too, and I was so glad when my third son got her. She had to leave on maternity leave and from then on he got Mr. B. He will have him until the end of the year. And he has flourished so well under Mr. B's teaching. Our teacher appreciation gift to Mr. B is a mini magnet board. I got the idea from greenbean on the Cricut Message board.
The board is 8" x 12". I got it at Home Depot. It is galvanized roof flashing. I covered it with patterned paper from a DCWV summer stack from a couple years back. I made it so that Mr. B can use either side of it. I added ribbon along the edges to give it a bit a finished look.
The "Mr. Barajas" is actually a big magnet. I thought he could use it on this board if he wanted or use it on any chalk or dry erase board. The background for this magnet is cut in four layers. The back layer is a navy blue rectangle. The next layer is a shape I cut in white and then inked with red chalk ink. The third layer is a sort of a cornflower blue. Both layers 2 and 3 are a shape from the Storybook cartridge that I modified on my Gypsy to fit my name. The top layer is from Basecamp and welded together on my Gypsy and shadowed in black. Then I added glossy accents and white ink dots all around. I also added a gold star.
The flag side is layered first with a patterened paper from the same summer stack and then with a die cut flag. The flag is cut from Graphically Speaking. The stars are from George and cut in a gold foil paper. The magnets on this are buttons that I added a circle magnet to.
I punched holes in the top and threaded some ribbon through it and just tied knots at the ends. I also added some clips on one end just for decoration, but they are usable. I had so much fun making this and I sure hope Mr. B likes it! TFL!

Wednesday, June 3, 2009

Boys Happy Birthday Crown-Card #3


It is soooo hard to create a teen boys birthday card. I had not set out to make one. This was part of the "Happy Birthday" series that I am making. I am so happy with how it came out. The base is the same as the Froggy cards. The crown is from the Indie Art cartridge. I ran the crown through the Swiss Dots embossing folder (can you tell I love that folder! LOL). Then I added the top layer to it in red. I also added some bling on the crown. On the inside I added a strip of matching ribbon. Photo corners are by an EK Success punch. TFL!


Froggy Happy Birthday-Cards #1 & #2


Ribbit, Ribbit!! I had a wonderful time making several "Happy Birthday" themed cards with the same base card. The base card is a .cut file designed by Susanbluerobot. I made some changes on the font on a some of the cards. After I cut the base card on several different double sided designer papers, I went ahead and embellished away. It was way fun!

So here are my first 2 cards. They are similar froggy cards. The paper is Actopus to Zelephant by K and Company. It has some foil on it, but it is hard to see in the photos. The cards are slightly different. I used the Swiss Dots embossing folder on parts of the cardstock on the front of the card. All the photo corners on the first one are from the Slice machine design card Animal Crackers. The photo corners on the inside of the second card are from an EK Success punch. TFL!

Tuesday, June 2, 2009

Thank You Card


I need a fresh start in life and what better way than to start with a new blog. I am starting things off with a simple "Thanks" card. I made this for a friend that has helped me a lot in the last 6 months. I created this card with my Cricut and Design Studio. I used the George and Basic Shapes cartridge for all of the cuts. I cut the flowers at 2 inches and ran them through the Cuttlebug with the Swiss Dots embossing folder. I inked all the edges with Chestnut Roan Chalk ink. The photo corners are an EK Success punch. If you would like a copy of the Design Studio file you can email me at scrapbooknut2002@yahoo.com. TFL!