Friday, December 2, 2011

My Perfect Imperfection

Warning!  This is not a “crafting” post.  Just some personal observations about life.

I have been reading some blogs lately about how we women are realizing it is “okay” to be imperfect.  I came across this post On Upstairs Friends which I got through a crafting blog I read regularly (Just What I {Squeeze} In).  It was so great to read!  This particular article was about letting friends see that we are not necessarily the perfect housekeepers.  It reminded me so much of my own life.  The home we live in is not perfect, but I am very grateful to have a roof over my head.  I keep it as clean as I can.  I am often limited by my health (one way or another).  I am trying to raise my family, work 2 part time jobs, fulfill Church callings, etc .  Thankfully I am able to work both my jobs from home and they are both great jobs!  And I know that my life is like so many other woman.  We all work so hard!  And some days I try to get everything stuffed in the closets, under the beds, behind the couches, and every other hiding place I can find just to make it look okay for friends. 

So yesterday one of my good friends is over.  And let’s just say my youngest son doesn’t like to flush the toilet or watch where he is aiming when he pee’s.   And all my kids think that the mirror is a place to do toothpaste art.  I didn’t have time to check out the bathroom before she came over. wa wa wa…..So, she goes in the bathroom and I am thinking, oh crap.  But I just told myself that it was ok.  She is not going to dis-own me because of a non-flushed toilet or a mirror full of toothpaste.  She is not going to care if I am not a perfect housekeeper.  So, when she came out of the bathroom I just said “sorry if there was any pee in the toilet”.  She just smiled and we just went on talking about crafty stuff.  She is a great friend.  It reminded me that a friend will always love you for the person you are and doesn’t care about silly things like how perfect a housekeeper you areSmile 

Tuesday, November 29, 2011

Pop Up Ornament

front1front whole


top-flatflat-bottom


Hi All! I hope everyone had a wonderful Thanksgiving and is looking forward to Christmas! I know I am! This adorable pop-up ornament is a die-line made by my good friend Cathy Martin over at Snip Tuck Design. She is a fabulous up and coming electronic die cut designer. Currently she sells through her own blog and Etsy. You can buy this and some other fabulous die cuts there.


The pop-up ornament is cut using my Pazzles Inspiration. I cut it out of a medium weight chipboard and then I cut it again on a piece of patterned paper. I cut the patterned paper so that each part of the ornament would cut as a separate piece to make it easier for decorating.


The “Merry Christmas” is from the Cricut cartridge Wild Card. I put it through my Xyron 250 upside down. Then I generously sprinkled it with Martha Stewart fine glitter. Then back through the Xyron an the back side of the die cut to stick it to the ornament.


I added misc. embellishments: snowflake buttons, ribbon, tulle, bells, glitter pen, Cat’s Eye blue chalk ink to spice it up.


Thanks for looking…and don’t forget to check out Cathy at Snip Tuck Design.

Monday, September 12, 2011

Fall Tree and Flowers

front 1    
Hi All!  This is a card I made for fall.  The card base was made on my Pazzles inspiration.  So were the flowers and the leaves.  The flowers were a free file from http://www.pazzles.net/wordpress/2011/09/02/twirled-flowers.  For the card base I just created an oval, copied it and welded it to another.                                                             
     All the paper is from DCWV.  They always have these really great sheets of paper in their stacks that you can cut apart to make tags or cards or things like that.  Well, the trees came from one of those sheets of paper from this years Autumn Stack.  The buttons are from my stash.  The twine is from Reallyreasonableribbonclub.com.  To get the effect I did with this card, first I punched holes with my 1/8th inch hand punch, then I sewed up one side of the card and then back through those same holes on the opposite side of the card. Thanks for looking!

Monday, August 22, 2011

Giggle and Warm Wishes

front 1

giggle 1

close up of rose

Hi Y’all! Here are a couple more cards.  And here is the recipe(s):

  • Basic white card base
  • Printed paper-Daisy D’s
  • Nestabilities Shape for 3 middle shapes
  • Cricut Flower Shoppe for flower and leaves
  • Queen and Co. for Pearls
  • Fiskars for rubber stamped images
  • border done by folding paper in various places and then stapling and gluing down.
  • Misc.-pop dots, glitter pen

FRIEND

Front 1


Front 2


close up 1


Hi all! Here is another card I have been working on. It was pretty easy to make. Here is the recipe:


Paper-Printed: Michaels recollection Cardstock, DCWV


Paper-Cardstock: Core’dinations


Brads (flower centers): made with the Itop brad maker and the paper listed


“friend”: chipboard


Flowers: nestabilities circle scallop shape


Leaves: Cricut Flower Shoppe and Free hand


Misc.: Ribbon, Pearl Glimmer Mist, Glitter mist


Thanks for looking!!!!

Thursday, August 18, 2011

Celebrating 17 Years!

front 1

bottom flowers and bling

right corner close up

in frame

So this is me and my dear hubby.  Last year we celebrated our 17th wedding anniversary.  We are also high school sweethearts so we have been together for 22 years together all together!  He is a really wonderful man and I feel blessed to have him!  I made this layout to hang on our wall as a momento of our anniversary last year.  It is a 12 x 12 layout that is mounted in a shadow box. 

I used my Cricut Imagine to make the layout.  The background paper is printed on the Imagine.  So is every other printed paper on this layout.  All the flowers were printed and cut on the Imagine as well.  The title papers were cut with using one of the basic shapes that comes installed on the Imagine.

I cut the flowers using the Flower Shoppe cartridge and the Mothers Day Bouquet cartridge at varying sizes.  The photos are mounted on black cardstock and then the newspaper print paper.  The side borders are a Fiskars punch.  The rhinestones are by Recollections.  I made a small bunched up border at the bottom and stapled it on.  I used my glitter pen and white pen here and there.  The letter stickers are by Jolee’s Boutique.  TFL!

Friday, July 15, 2011

Basketball Thanks Card and Sliceform-Pazzles

front


backinside


side view


sliceform2


My oldest son has been a fan of basketball his whole life. He has played at the YMCA since he was 8. He lives and breathes basketball. The Y is a wonderful league. It is filled with amazing men and woman who volunteer their time and talents. But, it is not a highly competitive league. They focus on team work and building self esteem. Which is totally amazing. My son tried to play in a travel league for one season, but the games were on Sundays, and that is our Sabbath day. He played the season, including the Sundays. But he ended up not liking breaking the Sabbath day. Me and his dad didn’t like that part of it either. But, it was a good lesson learned. He has since excelled at the Y. He is now trying out at the High School he will be attending. And let me tell you that is a whole new ball game (no pun intended…lol). So, on to the reason behind the card. My son has always been blessed with great coaches. But, there is this one wonderful young man. (I call anyone younger than me by 5 or more years “young”). I will call him Coach D. Coach D asked my son to be on his travel team. We thought, great, another chance at a travel team. My son practiced with the team in preparation for the season until we found out that all travel teams in our area play their games on Sundays…..wawawa….oh well. But, Coach D, being the kind young man he is, asked my son to still practice with them so he could continue to improve. And he did for a while. And now that he is trying out for High School ball, Coach D is taking the time to coach my son 1 on 1 and giving him a chance at really growing. And let me just tell you that Coach D has “mad skills”! I just feel really grateful!


Forgot to add...this was cut on my new Pazzles machine. My husband and kids got it for me for my birthday this month. All files were from Pazzles.net, except the sliceform. I purchsed that from Paperthreads.com.


Monday, June 27, 2011

Mosaic Tile Cards-GBS

Mosaic Squares 2

celebrate

Happy Birthday1

thanks

back of cards

I got my inspiration for these cards from the July/August issue of Paper Crafts magazine.  They give you a card layout design and some samples and then you use them as inspiration.  And this is what I came up with.  They are super easy to make.  The only Cricut on it is from George and Basic Shapes.  It is the square shape.  They are cut at    1 1/4”.  I used 12 squares per card.  The paper is from the K and Company stack Watercolor Bouquet.  The prints are a double sided paper.  The sentiments are rubber stamped.  The lace is from my stash.  The flower is from a ribbon.  I just cut them apart individually.  TFL.

Wednesday, June 8, 2011

THX-Elegant Edges

front 1

side 1

side2

back 1

I got the inspiration for this card from the current issue of the CARDS magazine.  The card size is 5.5” square.  All the paper is from DCWV Glam Gal Stack.  I had some chipboard letters that I wanted to use, so I glued them down to the paper I liked and then used my Exacto knife to cut around the letters.  Then I put them on pop dots.  I made the rosette by using a 1.5” x 12” piece of cardstock and scored every 1/2”.  I used ribbon that I had on hand for the leaves.  The button in the middle is an antique button from a stash a friend gave me.  The doily is from a pack I got at Michaels.  All the borders on the front, back and in the middle are from the Cricut cartridge Elegant Edges. 

I am sure I left something out.  But, I got a tooth pulled yesterday!  Oh my word, did that hurt.  Not during, but afterward. And it still hurts something fierce!  I have tried to save this molar for 5 years with root canals, crowns, etc.  But, it just didn’t work.  And now I have a big old hole in my mouth.  It’s a bummer getting older….lol!

Monday, June 6, 2011

Anything Card

front 1

Hi Everyone!  today’s card is just a quicky.  It is a card that could be used for just about any occasion.  I like having a few of these on hand in my card stash for emergencies.  Then I can just rubber stamp or print a quick sentiment to go on the inside.

The card is close to an A4 size.  It is just a bit bigger.  The scallop shapes are nestabilities.  They are the largest 2 scallops in the regular scallop shapes.  The butterfly is a K&Co. Sticker.  The base is embossed with my cuttlebug and a quickutz folder.  The ribbon is Making Memories.  I just rippled it back and forth and used my hot glue gun to glue it down.   the brad is a find at the Target Dollar Spot.  Thanks for looking!

Saturday, June 4, 2011

Teacher Appreciation Lollipop Topiary

side view


full front


side view


My 6 year old sons 1st grade teacher is the absolute best! I feel so blessed to have been the Room Parent for his class this year. It was my first year doing this particular job and it was so great! For teacher appreciation week this year the school suggests the children do something sweet for their teacher everyday. Each day has a theme. Everything is very inexpensive and easy to do. I decided to take this idea and run with it a little bit. I cannot post all the things I did because the projects include pictures of children in the class.


This project was so fun. I made a topiary tree. I used my Cricut, Gypsy and good old George cartridge to make the flowers that go around the lollipops. I painted a huge Styrofoam ball different shades of green to make it look like the base of a bush. I added 2 wood dowels to the ball and into the base. The base is filled with moldable flower foam and tons of hot glue. That all went into a traditional flower pot. My favorite part of this project is that I got each of the kids to write a small note to the teacher and I attached it to the lollipop. So when the teacher chooses a lollipop to eat, she gets to read a nice note from one of her students. TFL!

Sunday, May 8, 2011

Happy Mother's Day Butterfly-Damask Decor


This is the card I made my mom for Mother's Day. The card base and butterfly are from the Cricut cartridge Damask Decor. The flowers on the front are from Mother's Day Bouquet. The finished size is 8.5" x 5.25". The patterned paper is from the DCWV Madamoseille stack. The cardstock is Core'dinations. On the back I used a Martha Stewart punch for the border. The flowers are handmade from spring mulberry paper rolls. The glam in the middle is from Michaels.
TFL.

Saturday, April 9, 2011

Friend-Imagine More Cards


Well, I got my Imagine replaced in record time! Thank you Provo Craft! And I got to work making this friend card. The Imagine More Cards cartridge has easily become my favorite Imagine cartridge. The base of this card is made with Elegant Edges. I used my Gypsy to weld 2 of the book covers together. I just placed 2 of the same shape on the mat, flipped one, overlapped them just a bit, grouped and then welded. And viola, a card base with a beautiful edge. I am really liking Elegant Edges too! This is a long awaited cartridge by many Cricut lovers.

The front of the card is all done with Imagine More Cards, cut at 4 inches. I cut pink cardstock just slightly bigger to go behind the image and for the inside of the card. I inked all the edges with a matching color to add depth and texture. I also used my Marvy glitter pen for some glitz. I sprayed the base of the card with Hot Chocolate Chalkboard Glimmer Mist. It is hard to see in the photo, but it adds some goodness in person. The word "Friend" is on pop dots.


I used pom pom trim and rolled it up in a circle to make an embellie and put a cute little button on top of that. I also added a bit of ribbon. The finished size is 5"x5" (the butterfly sticks out past this). Thanks for stopping by to take a peek!

Friday, April 1, 2011

Thank You Roses-Imagine More Cards


This is the last card I squeezed out of my Imagine before it finally qiut on me. After the update it kept having issues with printing. It kept having problems recognizing the print cartridges. Then it wouldn't cut. I did everything I could to fix it. I even put in new print cartriges, but to no avail. It got to the point that no matter how many times I reset, or took the ink carts in and out, etc. it just wouldn't work. But, even with all that, I still love my Imagine! Provo Craft customer service was wonderful and they are replacing my machine. So, they stand by their product and that is good enough for me. With new technology comes new issues and that requires a little patience on the consumers part. I know it is hard to be patient. And it is absolutely my worst virtue. But, I am learning :)

Anywho, onto the card...........I just love, love, love the Imagine More Cards cartridge. It has wonderful card fronts and patterned papers. This whole outside of this card was made with this cart except the "thank you". That was made with a rubber stamp and punched with a circle punch. I lined the inside of the card with a matching pink cardstock. I also used some Tim Holtz Distress ink all around again. I am beginning to really like that stuff! The card topper is popped into 3 layer for some real dimension. I used a Making Memories razor distressing tool to antique the edges. And I finished it off with some jute around the bottom. The patterned paper is from this cart on full page print. Thanks for looking! If you have any questions, please feel free to email at scrapbooknut2002@yahoo.com.

Tuesday, March 29, 2011

Just A Little Hello-Cricut Imagine Card

Front of Card

Alternate View Back of Card

I created this card for the Weekly Cricut Circle Blog Challenge. This weeks challenge is to create a layout with an "everyday" topic or a "just because" themed card. I chose the card and this is what I came up with. Everthing is cut on my Cricut Imagine. The pink paper is from Colorbok Flea Market. The "torn notebook" edge is a Fiskars punch. The ribbon is from the $1 bins at Target. All the die cuts on the front are from the Imagine More Cards cartridge. The card fronts from this cartridge go together so easy! It is hard to see in the photos, but I used my Sukura glitter pen all around the front to add just a bit of shimmer. I also distressed with Tim Holtz inks around the edges. The birdie and the 2 layers behind it are on pop dots. TFL! Hope you have a great week!

Thursday, March 24, 2011

Art Journaling

These pink/green/brown pages are my first set of pages. I had a blast making them. They really made me "feel". I have come to find that with every drop of paint, marker, paper, embellishment, word, etc. I really feel like I am "feeling" something in this journal. The journey so far has been amazing!


------------------------------------------------------------------
Believe it or not there is no green on these pages! Well, there technically is, but it was by accident. I put blue and yellow on the pages. And as I learned in Kindergarten, that makes green! Oh, and I learned from Journal Artista (aka Paula) that a Hotel Key/old credit card makes a great paint tool!

------------------------------------------------------------------
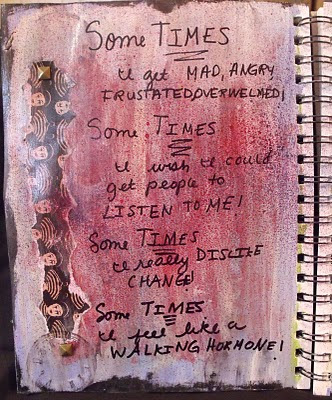
This next set of pages came about because of my recent frustration with both myself and my family. I adore my family. They are the best! But, I cannot get them to clean up after themselves for anything. I have tried begging, pleading, bribeing, giving consequences. And nothing works. I am also tired of myself. I feel sometimes like I am just a big hormone. I guess that is because I have 3 boys, a husband and most of the animals in my house are boys! I know I am a drama queen.
I want to send a huge thanks out to Paula at http://www.journalartistaart.com/. She has inspired me greatly! I would never have had the courage to try something like this if it wasn't for her. So, thank you Paula!